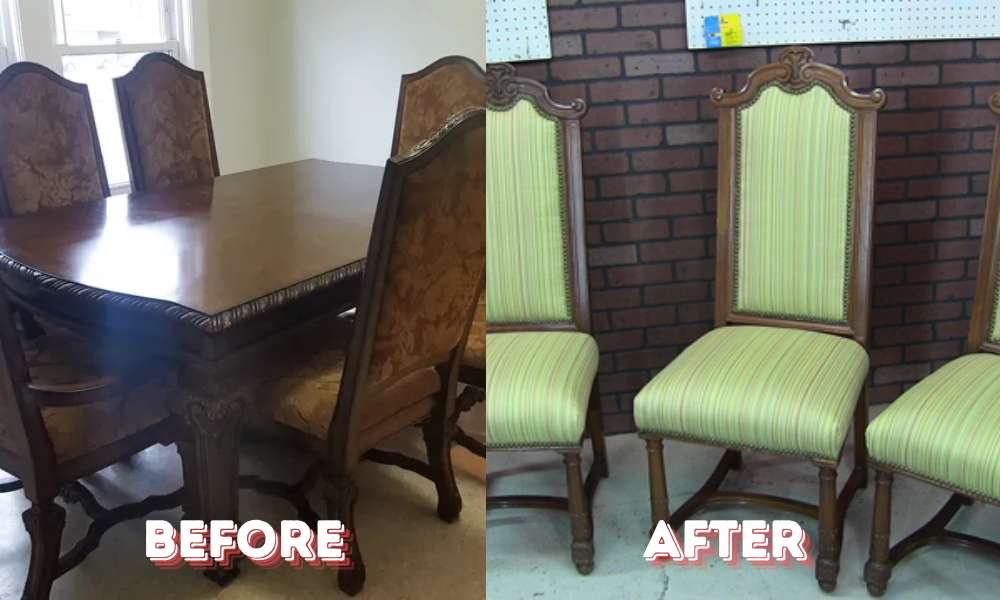
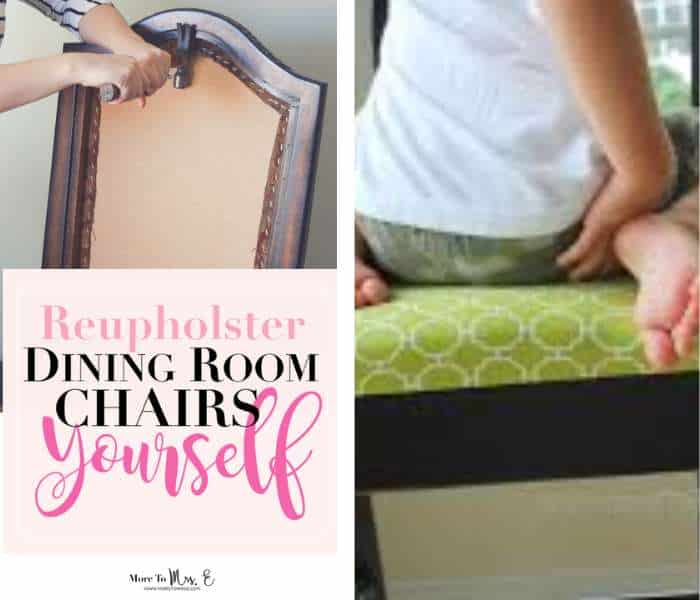
Reupholstering your dining room chairs isn’t always pretty much DIY; it’s about respiratory life returning into your furnishings, turning the antique into new. Maybe those chairs are worn down, or maybe they just don’t fit your style anymore. Buying new ones? Expensive. Impersonal. But reupholstering? Yes, it can seem overwhelming at first, but trust me, once you get started, even a beginner can achieve amazing, professional-looking results. Let’s dive into the basics and get you ready to reupholster a dining room chair seat and back with confidence.
1. Why Reupholstering is a Great DIY Project:
Reupholstering isn’t just a project; it’s a creative journey that challenges your skills and rewards you with a tangible piece of art—your very own masterpiece. Imagine taking a chair that’s seen better days and turning it into something not just restored but reborn.
The satisfaction? Immense. And, in a world filled with mass-produced furniture that lacks soul, reupholstering lets you create something truly unique, something that speaks to your style, your personality. It’s practical, yes, but it’s also a form of expression.
2. Benefits of Reupholstering Over Buying New Chairs:
Why throw away when you can revitalize? Reupholstering offers benefits beyond just aesthetics. It’s an eco-friendly choice—less waste, more sustainability. Plus, older chairs often have superior construction compared to today’s mass-produced options.
By choosing to reupholster, you’re not just saving money; you’re preserving quality. And let’s not forget the creative control.
You pick the fabrics, the colors, the patterns—it’s your vision, not some designer’s. That level of personalization? It’s rare and oh-so-satisfying.
3. Understanding the Basics of Reupholster a Dining Room Chair Seat and Back:
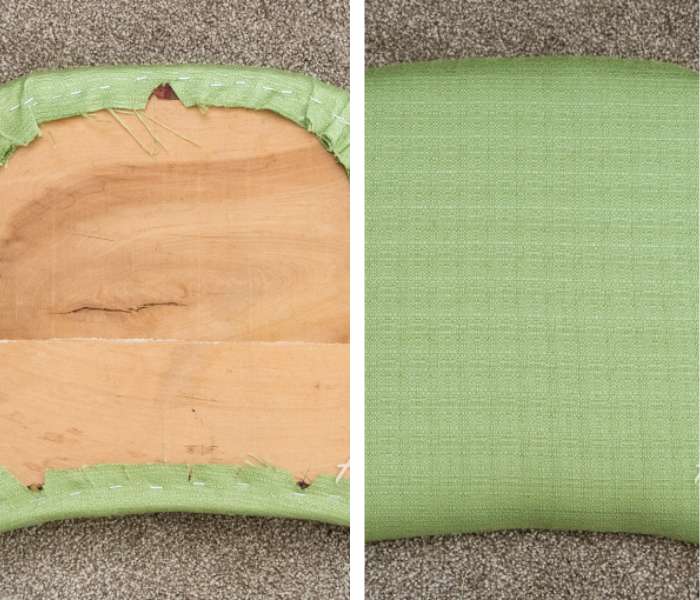
Before you jump into the reupholstering process, let’s get grounded in the basics. What does it involve? Essentially, you’ll be stripping away the old fabric, padding, and possibly even the springs, down to the bare chair frame.
Then, after a thorough inspection (and maybe a repair or two), you’ll bring in the new—fresh padding, crisp fabric—measured, cut, and attached with precision.
The result? A chair that doesn’t just look new, but feels new. Yes, it requires patience and the right tools, but the payoff? A piece of furniture that’s all yours, inside and out.
4. Tools and Materials You’ll Need:
Essential Tools for Reupholster a Dining Room Chair
Let’s talk tools—because the right ones make all the difference. At the top of the list?
- Staple Gun for securing the new fabric to the chair.
- Fabric Scissors sharp scissors are necessary for cutting fabric accurately.
- Tape Measure ensures precise measurements of the seat and back.
- Tack Remover or Pliers helps in removing old staples or tacks without damaging the frame.
- Sewing Machine optional, but useful for more intricate fabric designs.
They don’t just make the job easier—they elevate the finish from DIY to professional.
Choosing the Right Fabric for Your Chair Seat and Back

The fabric you choose? It’s everything. It’ll dictate not just how your chair looks, but how it holds up over time. Upholstery-grade fabric is your go-to—strong, durable, built to last.
Think about how the chair will be used: Will it see a lot of traffic? Then durability is key. What about the room it’s in?
The fabric should tie in with the overall décor, whether you’re going for bold and vibrant or subtle and sophisticated.
Additional Supplies: Staples, Foam, and Padding
Beyond tools and fabric, you’ll need a few other essentials. Staples to secure the fabric—make sure they’re the right size for your staple gun.
Foam padding? That’s where comfort comes in. Choose a density that feels just right when you sit down.
And don’t forget the batting or extra padding to ensure a smooth, even finish. These materials? They’re the secret to that polished, professional look.
5. Preparing Your Dining Room Chair:
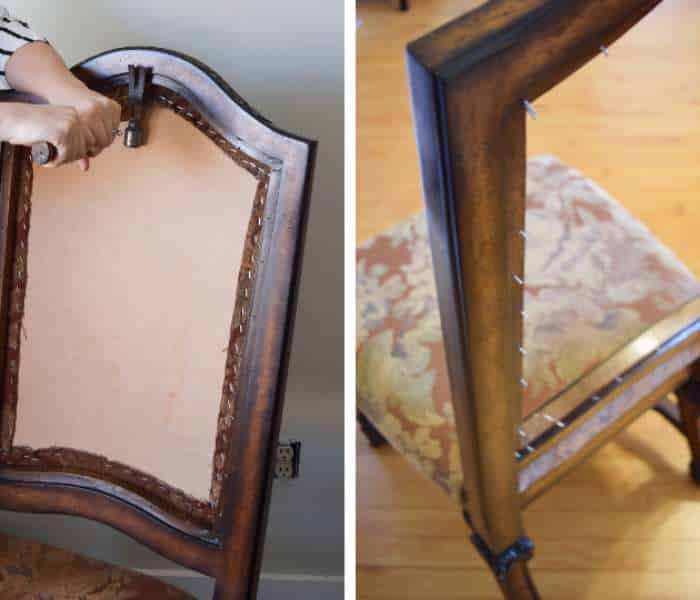
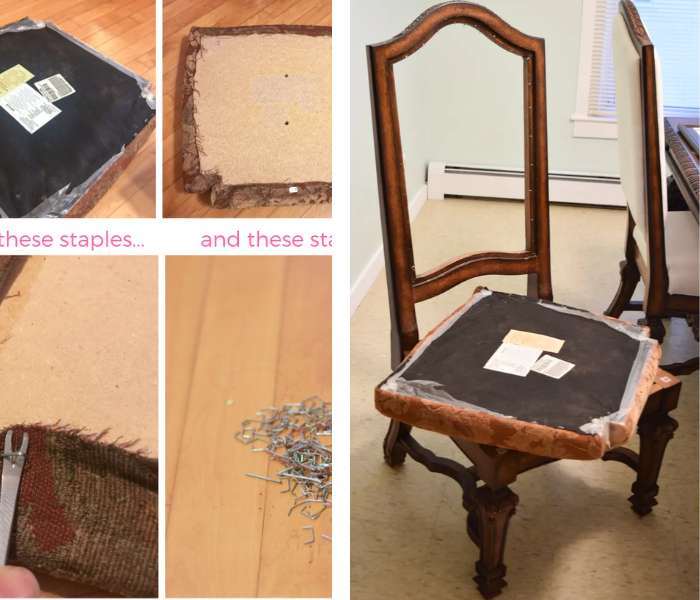
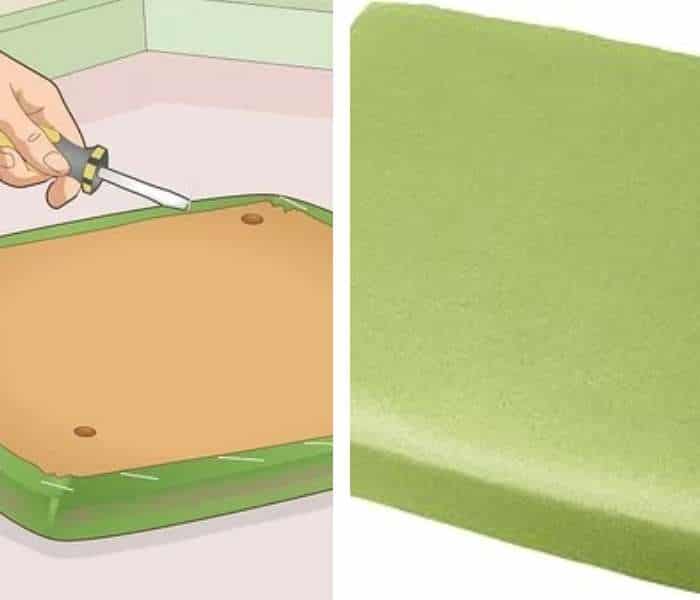
How to Safely Remove the Old Fabric:
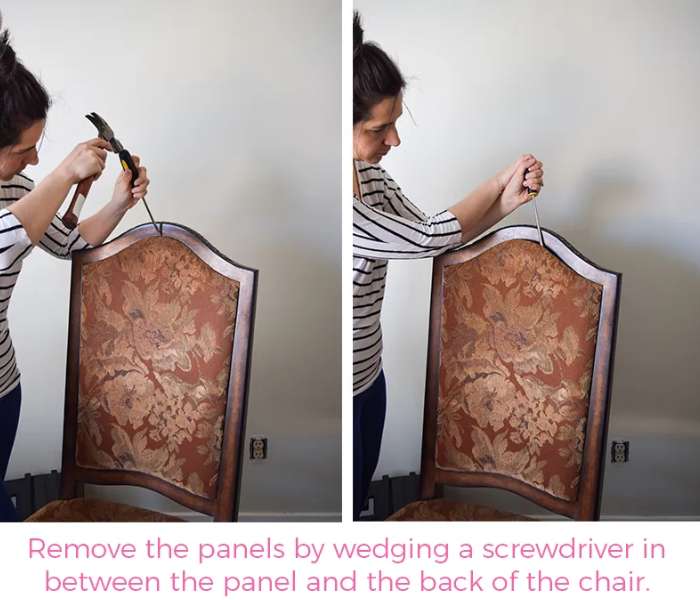
Patience is your friend here. Removing the old fabric requires care—pulling out staples, tacks, and whatever else is holding that tired upholstery in place.
Use a tack remover or pliers, but take your time. Avoid damaging the chair frame because you’ll need it intact for the new fabric. As you go, make mental notes on how the fabric was attached—it’s a blueprint for the new upholstery.
To ensure consistency and protect fabric dining chairs, save a piece of that old fabric; it’ll serve as a template when it’s time to cut the new material.
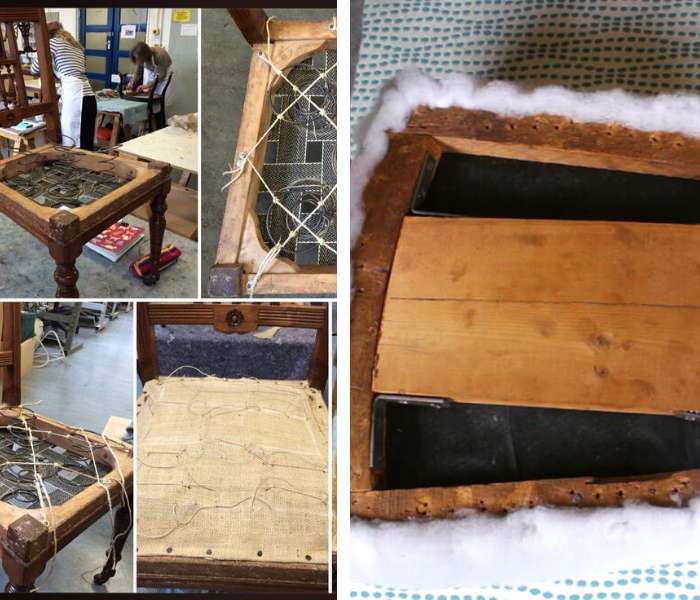
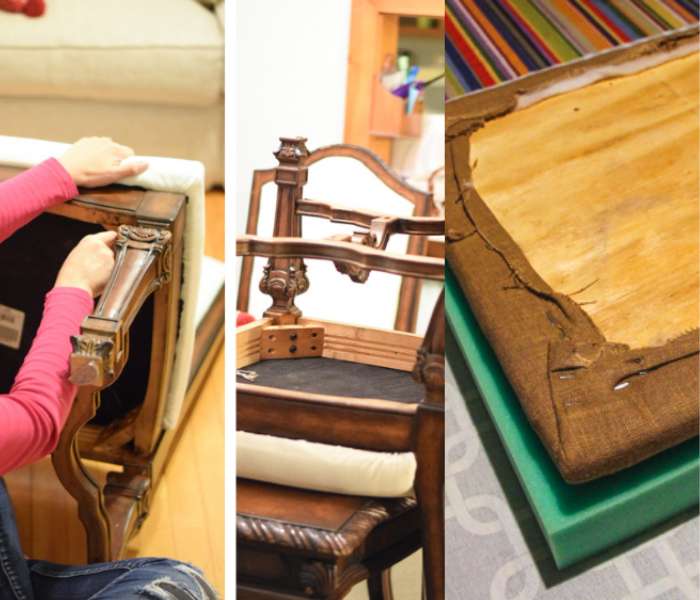
Inspecting the Chair Frame for Repairs:
Old fabric off? Time to inspect the frame. Look for loose joints, cracks, or anything else that might compromise the chair’s integrity.
Tighten screws, apply wood glue where needed, and give any repairs the time they need to set. This isn’t just about making the chair look good; it’s about ensuring it’ll last.
And while you’re at it, clean the frame, touch up any scuffs or wear—make it look as good as it’s about to feel.
Cleaning and Prepping the Chair for New Upholstery:
Prepping is where the magic starts. Dust, dirt, and old adhesive? They’re the enemy of new fabric. Use a gentle cleaner suited to your chair’s material—whether it’s wood, metal, or something else. Let it dry completely before moving on.
This step isn’t glamorous, but it’s crucial. A clean, prepped chair ensures the new upholstery adheres properly, giving you that smooth, professional finish you’re aiming for.
6. Cutting and Preparing New Fabric:
Measuring the Chair Seat and Back for Fabric Cuts:
Precision is everything when it comes to cutting fabric. Measure the seat and back dimensions carefully, adding a few inches all around for wrapping and stapling.
If your chair has curves or angles, account for them. It’s better to have a bit too much fabric than to find yourself short when it’s time to staple.
Tips for Cutting Fabric Accurately:

Cutting fabric might seem straightforward, but it requires a steady hand. Lay the fabric on a flat surface and use sharp fabric scissors for clean cuts.
If you’re working with a patterned fabric, make sure the design aligns before cutting. Straight lines, even edges—take your time. Mistakes here can cost you later.
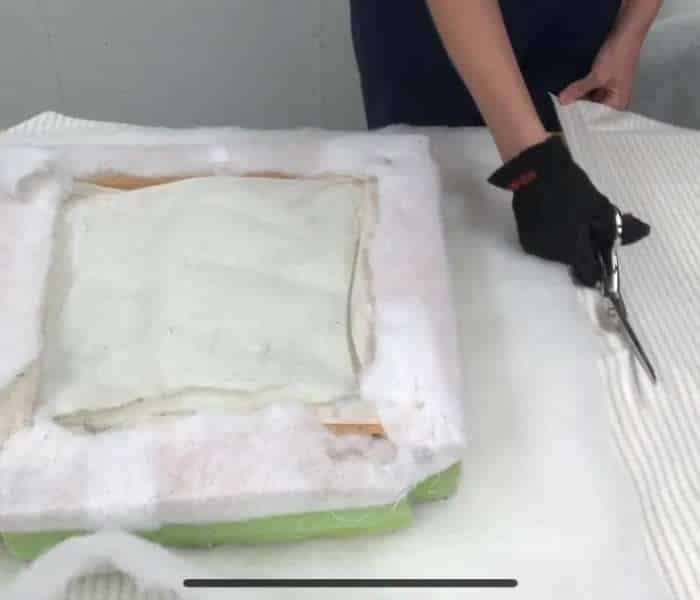
Prepping Foam and Padding for a Comfortable Seat:

Comfort isn’t just about looks—it’s about feel. Cut the foam padding to fit the seat and back, leaving it slightly larger than the actual dimensions to account for compression.
Layer batting or additional padding over the foam to create a smooth, plush surface. Secure it with a few staples or adhesive spray, so everything stays in place when you’re ready to add the fabric.
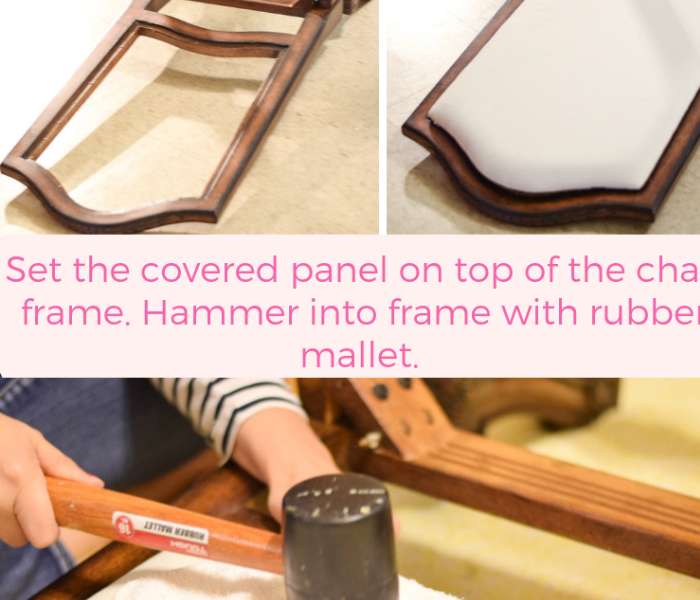
7. Reupholstering the Seat:
Attaching New Foam and Padding to the Seat:
Now it’s time to bring comfort. Place the foam on the seat, followed by the batting or additional padding. Center the fabric over it all, making sure any patterns align perfectly.
Start stapling from the center and work your way out, pulling the fabric taut as you go to avoid wrinkles or sagging. This is where your attention to detail will really pay off.
Wrapping and Stapling the Fabric for a Smooth Finish:
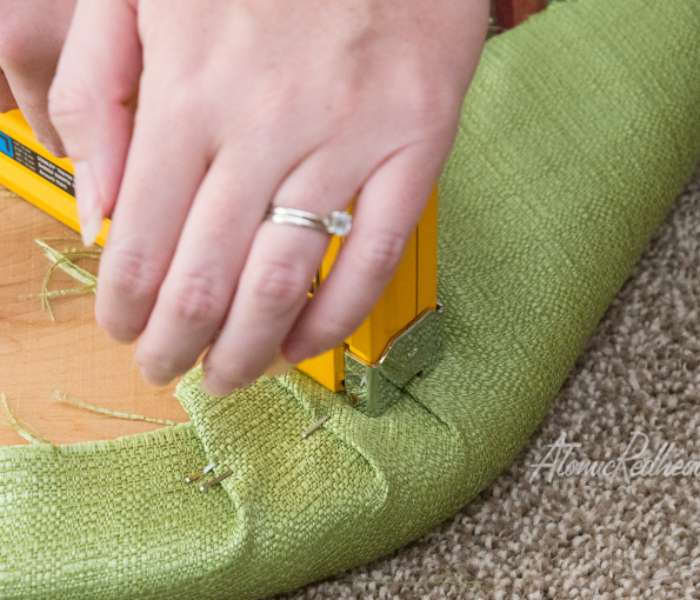
The goal? A smooth, wrinkle-free finish. After securing the fabric in the center, move around the seat, pulling the fabric tight and stapling at regular intervals.
Pay close attention to the corners—fold the fabric neatly before stapling to avoid bulges. Trim any excess fabric for a clean, professional appearance.
How to Handle Corners and Edges on the Seat:
Corners and edges can be tricky, but with the right technique, they’ll look flawless. For corners, fold the fabric in a neat pleat before stapling. For edges, keep the fabric pulled tight and secure it evenly.
This step might require some adjustment as you go, but taking the time to get it right will make all the difference.
8. Reupholstering the Chair Back:
Attaching Foam and Padding to the Chair Back:
Reupholstering the chair back? It’s a similar process to the seat. Start by attaching foam padding, ensuring it’s centered and secure.
Add a layer of batting or additional padding for extra comfort. The foam and padding should extend slightly beyond the edges of the chair back, creating that cushioned effect once the fabric is applied.
Securing the Fabric to the Backrest:

With padding in place, it’s time to attach the fabric. Drape it over the backrest, aligning any patterns. Start stapling at the top and work your way down, pulling the fabric tight as you go to avoid wrinkles.
Continue along the sides, ensuring the fabric is smooth and even. This is where your careful preparation really pays off.
Creating a Professional Look with Tidy Edges:

Tidy edges are key to a professional-looking reupholster job. Once the fabric is secured, trim any excess material with sharp fabric scissors.
Consider adding decorative nails or piping to conceal the edges and give the chair a finished, polished look.
8. Reassembling the Chair:
Reattaching the Seat and Back to the Chair Frame:
With the seat and backrest reupholstered, it’s time to put it all back together. Reattach the seat first, using the original screws or fasteners. Ensure it’s securely in place and level. Then, attach the backrest, adjusting as needed to align everything properly. A well-assembled chair not only looks great but provides a comfortable seating experience.
Ensuring the Chair is Sturdy and Well-Balanced:
A sturdy, well-balanced chair is essential for safety and comfort. After reassembling, check for any wobbling or loose joints. Tighten screws and bolts as needed.
Sit in the chair to test stability, making any final adjustments to achieve the desired balance. This step ensures your chair will stand the test of time.
Final Touches: Trimming Excess Fabric and Securing Loose Ends:
The last step? Trimming any excess fabric and securing loose ends. Use fabric scissors to carefully trim along the underside of the seat and backrest.
Tuck in any loose edges and secure them with additional staples or adhesive. This attention to detail gives your chair a polished, professional appearance.
9. Caring for Your Newly Reupholstered Chair:
How to Maintain the Fabric for Longevity:
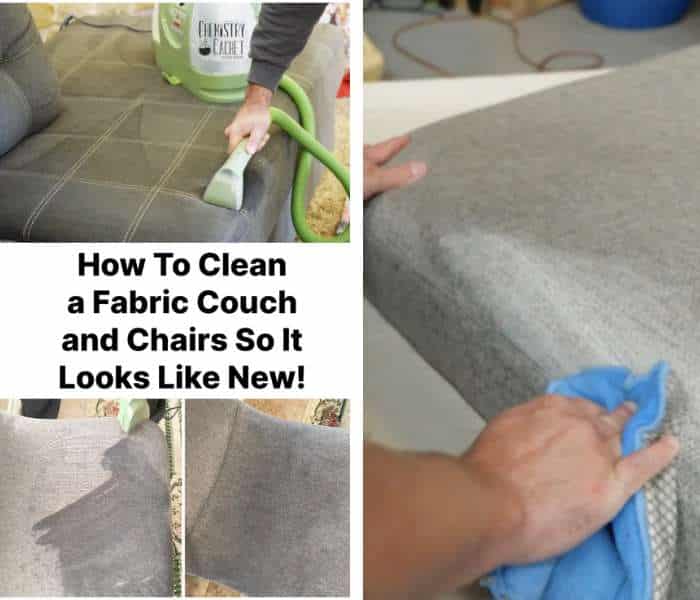
Want that fresh look to last? Regular maintenance is key. Vacuum the fabric to remove dust and debris. Use a fabric protector to guard against stains. Clean spills immediately with a damp cloth and mild detergent. And keep the chair out of direct sunlight to prevent fading.
Tips for Cleaning and Protecting Your Upholstery:
Maintaining the look and longevity of your reupholster a dining room chair requires regular care. Here are some simple tips to keep your upholstery in top condition:
1. Keep your chairs out of direct sunlight to prevent fading and damage to the fabric.
2. Use a vacuum with an upholstery attachment to remove dust and debris.
3. Blot any spills with a clean, dry cloth and use a mild fabric cleaner if necessary.
4. Apply a fabric protector spray to prevent stains and make cleaning easier.
5. If your chairs have removable cushions, rotate them regularly to ensure even wear.
When to Consider Reupholstering Again:
Even with the best care, upholstery will eventually show wear. When the fabric becomes faded, torn, or worn, it might be time to reupholster again.
High-traffic chairs may need reupholstering every few years; less-used ones, much longer. Be proactive—don’t wait until the chair is completely worn out.
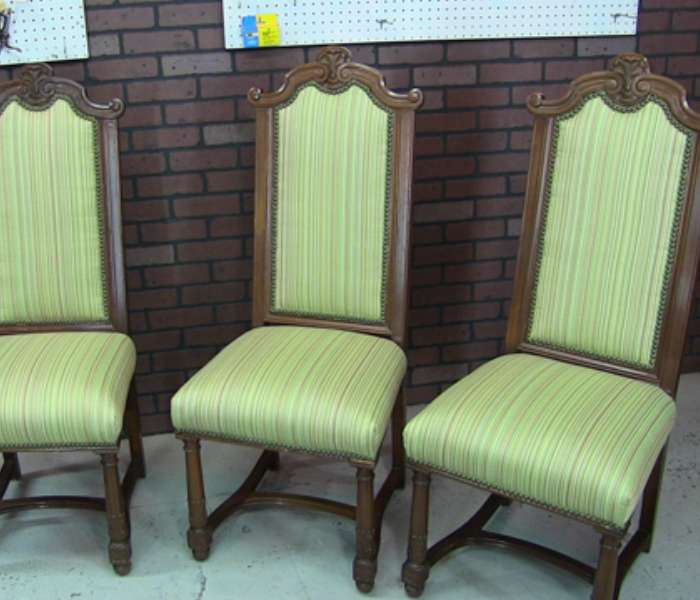
Conclusion:
Reupholster a dining room chair is more than just a project; it’s a transformation. From selecting the perfect fabric to adding those final touches, each step is an opportunity to create something beautiful and functional. The skills you’ve gained can be applied to other furniture pieces. Customize your home décor to your exact taste. With the right tools, materials, and a bit of patience, you can transform ordinary chairs into extraordinary pieces that enhance your home’s beauty and comfort. By following the process carefully, you can achieve a professional-looking result that brings new life to your furniture.
FAQs:
How Much Fabric Do I Need to Reupholster a Dining Room Chair Seat and Back?
Generally, one to two yards should do the trick, but it depends on the size of the chair. Always buy a little extra, just in case.
Can I Reupholster a Chair Without Removing the Old Fabric?
You can, but it’s not ideal. Old fabric can weaken over time, causing the new upholstery to sag or wrinkle. Best to start fresh.
What Type of Fabric is Best for Dining Room Chairs?
Go for long lasting, stain-resistant fabrics like cotton blends, microfiber, or artificial upholstery cloth. They’re smooth and easy and might manage each day’s use.